Aadhaar Card Update Guide
Learn how to update your Aadhaar card online and offline using the UIDAI portal, mAadhaar app, and nearest Aadhaar centre. Update your name, address, date of birth, mobile number, email, and photo easily.
What Can You Update on Your Aadhaar?
Demographic details (online + offline): Name, address, date of birth, gender, mobile number, email address, and relationship information (like parent or spouse name).
Documents (online + offline): You can update your Proof of Identity (PoI) and Proof of Address (PoA) documents. This is especially useful if you enrolled with older or weaker documents and now have a passport, voter ID, or PAN card.
Biometric data (offline only): Fingerprints, iris scans, and your photograph. These can only be updated by visiting an Aadhaar Seva Kendra in person.
How Much Does It Cost?
UIDAI has a revised fee structure for 2025-2026. Here's what you'll pay depending on what you're updating:
| Service | Fee (₹) |
|---|---|
| Demographic update (name, address, DOB, gender, mobile, email) | ₹75 |
| Biometric update (fingerprints, iris, photo) for adults | ₹125 |
| Biometric update for children (first mandatory update) | Free |
| Document update at an enrolment centre | ₹75 |
| Document update online via myAadhaar | Free (until 14 June 2026) |
| Aadhaar printout (A4 colour print) | ₹40 |
How to Update Your Aadhaar Address Online
This is probably the most common update people need. You've moved to a new city, changed your rented flat, or bought a new house. Here's how to update it online:
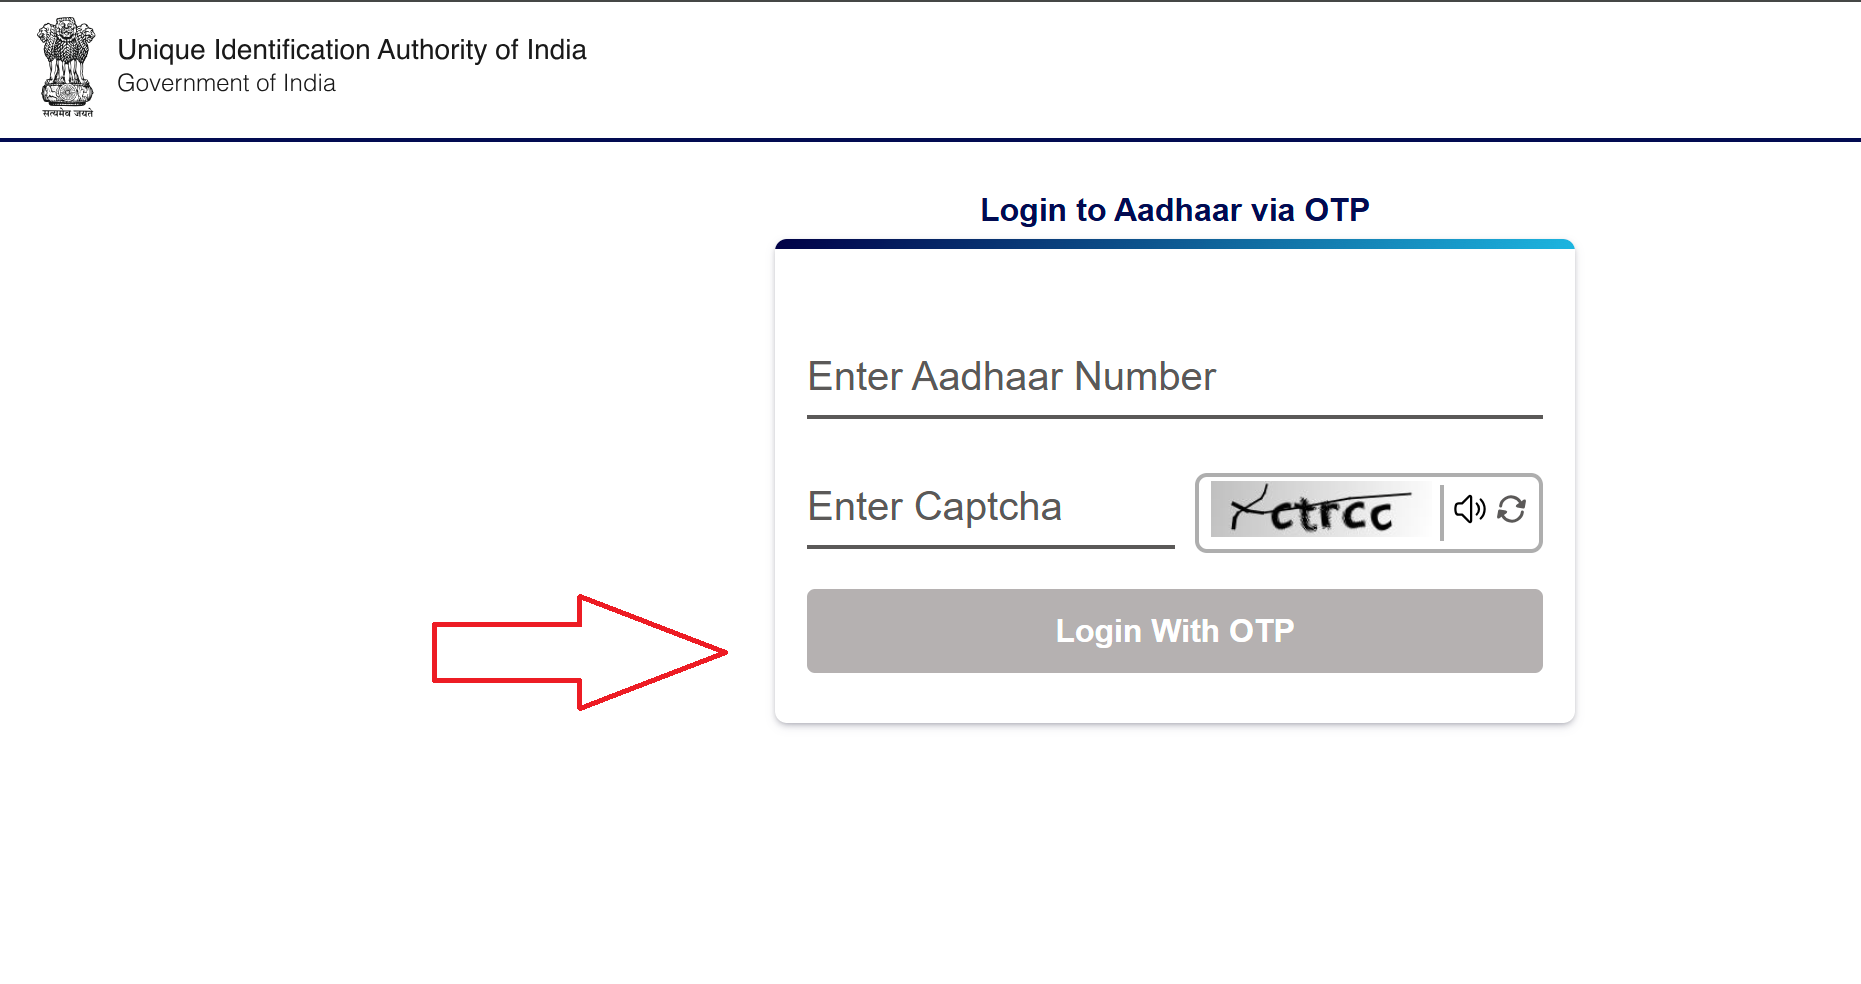
- Go to the myAadhaar portal at myaadhaar.uidai.gov.in
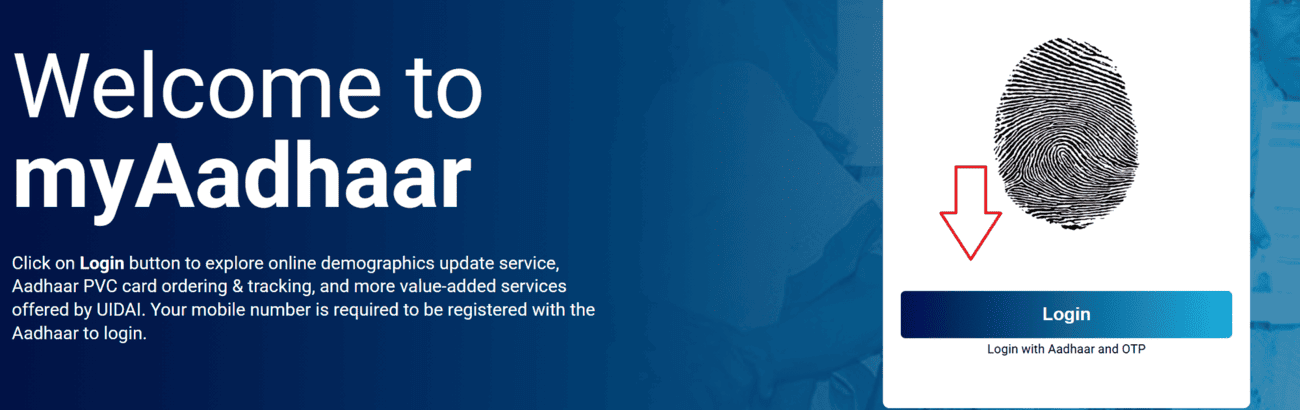
- Log in with your Aadhaar number and verify using OTP sent to your registered mobile
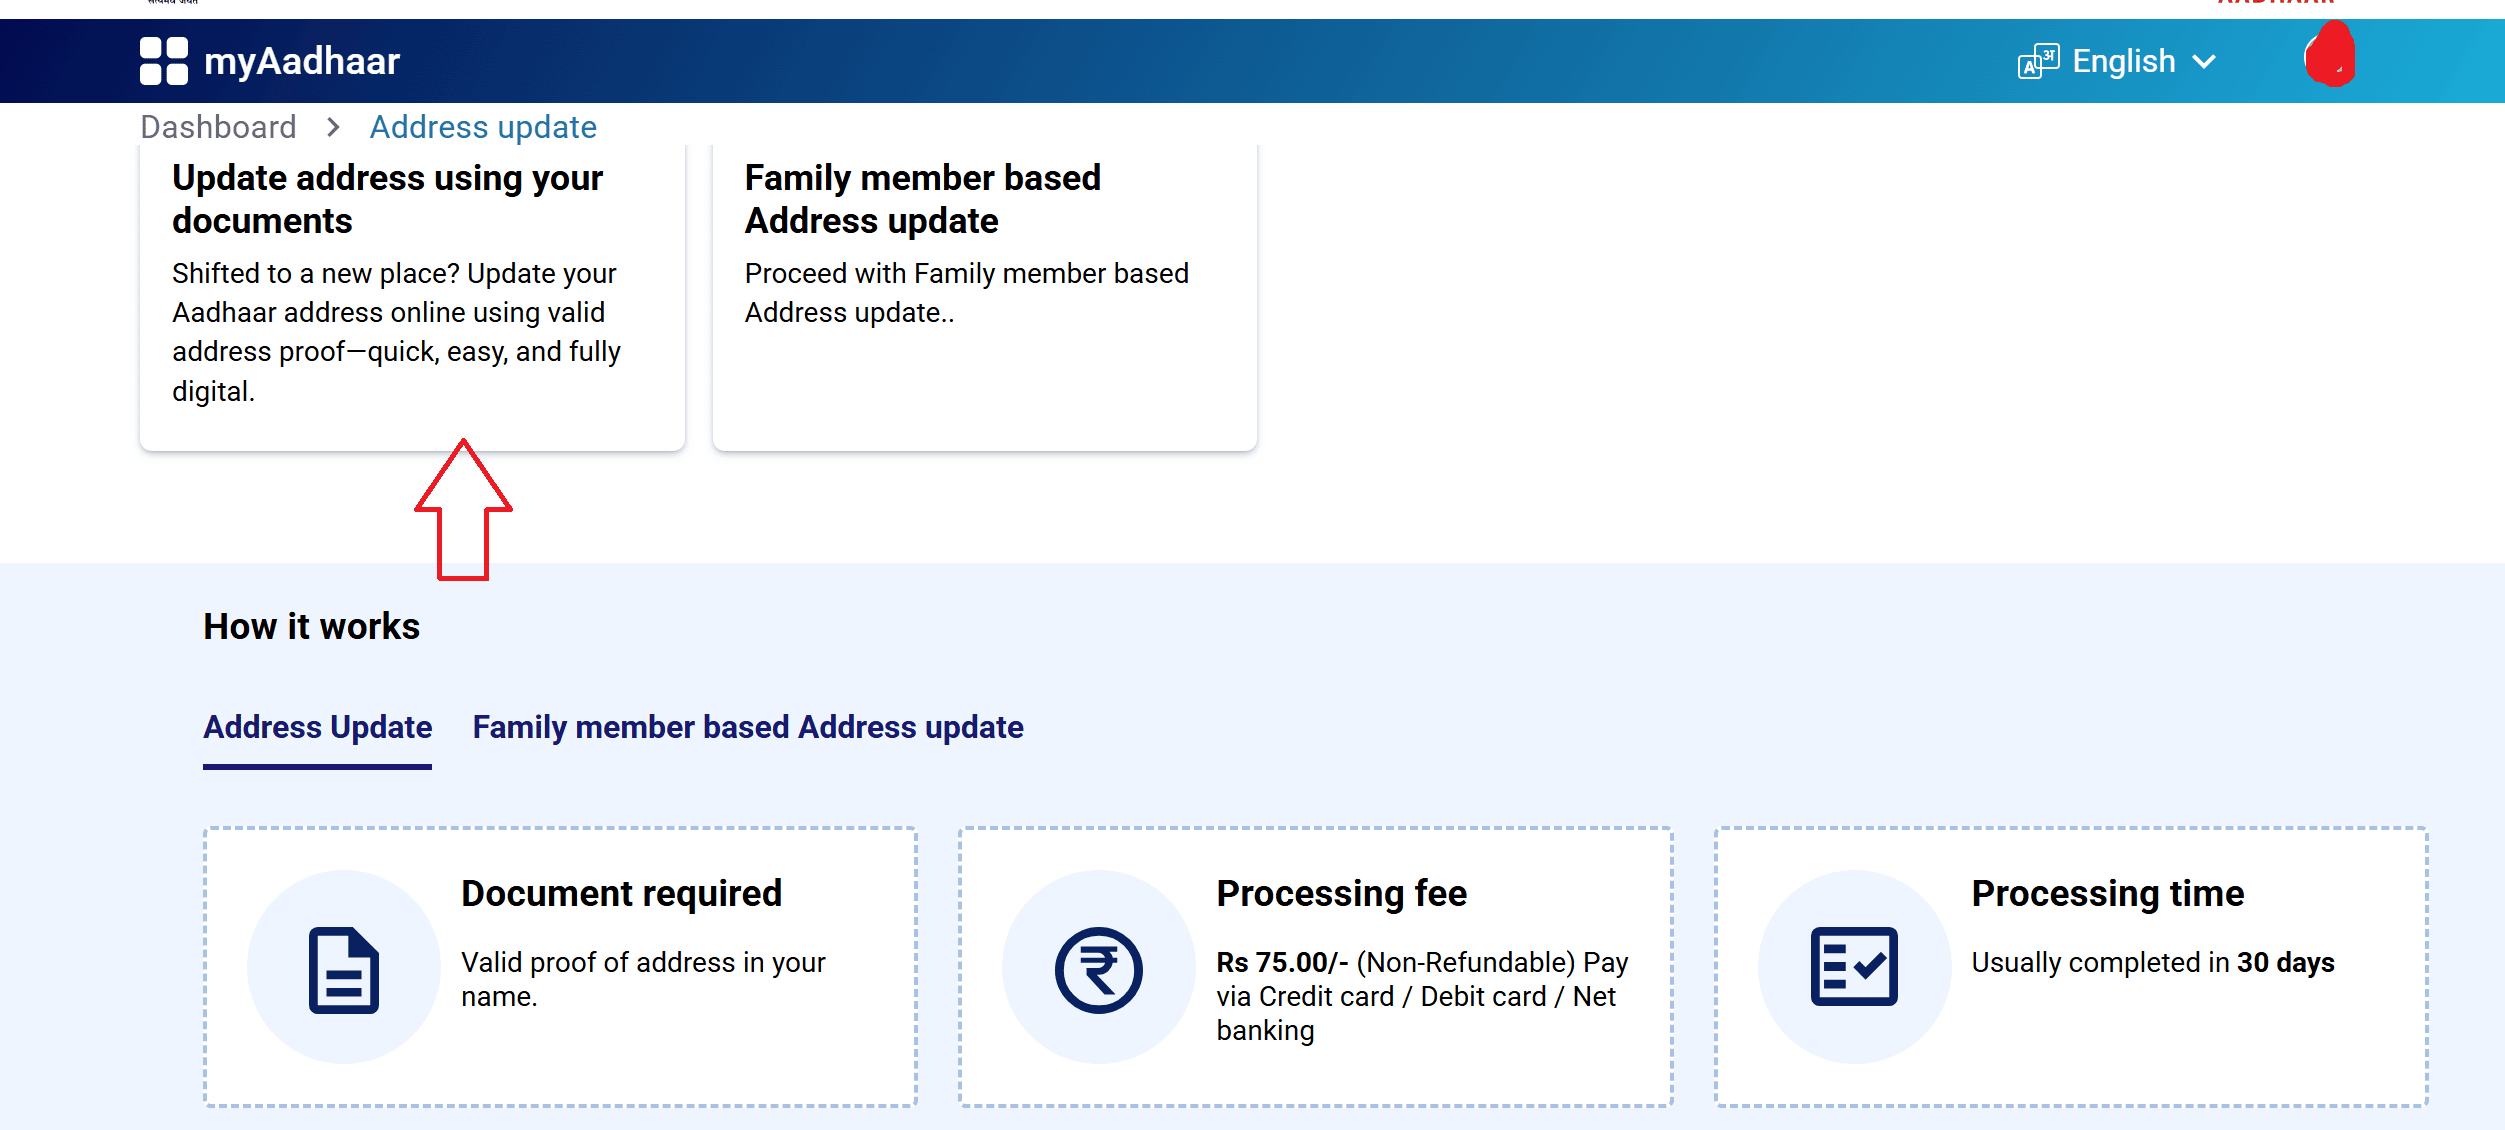
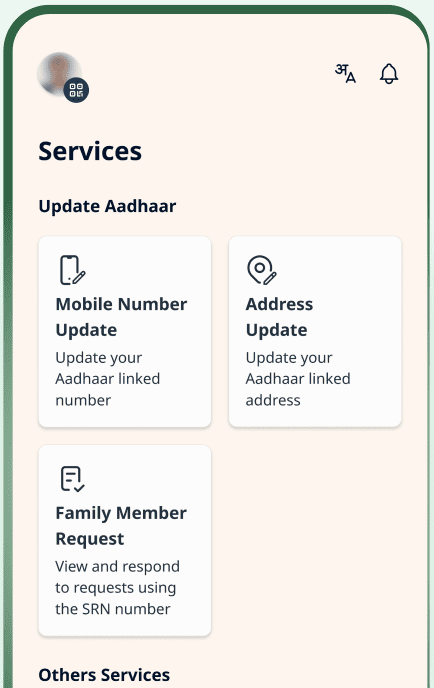
- Select "Address Update" from the services
- You'll see two options:
- Update address using your own documents
- Family member based address update (useful if you don't have a document in your name at the new address)
- Enter your new address details
- Upload a clear, coloured scan of a valid Proof of Address document
- Submit the request and save the SRN (Service Request Number) that you receive
Processing time: Usually takes around 7 to 15 days, but it can stretch to 30 days depending on verification.
What If You Can't Do It Online?
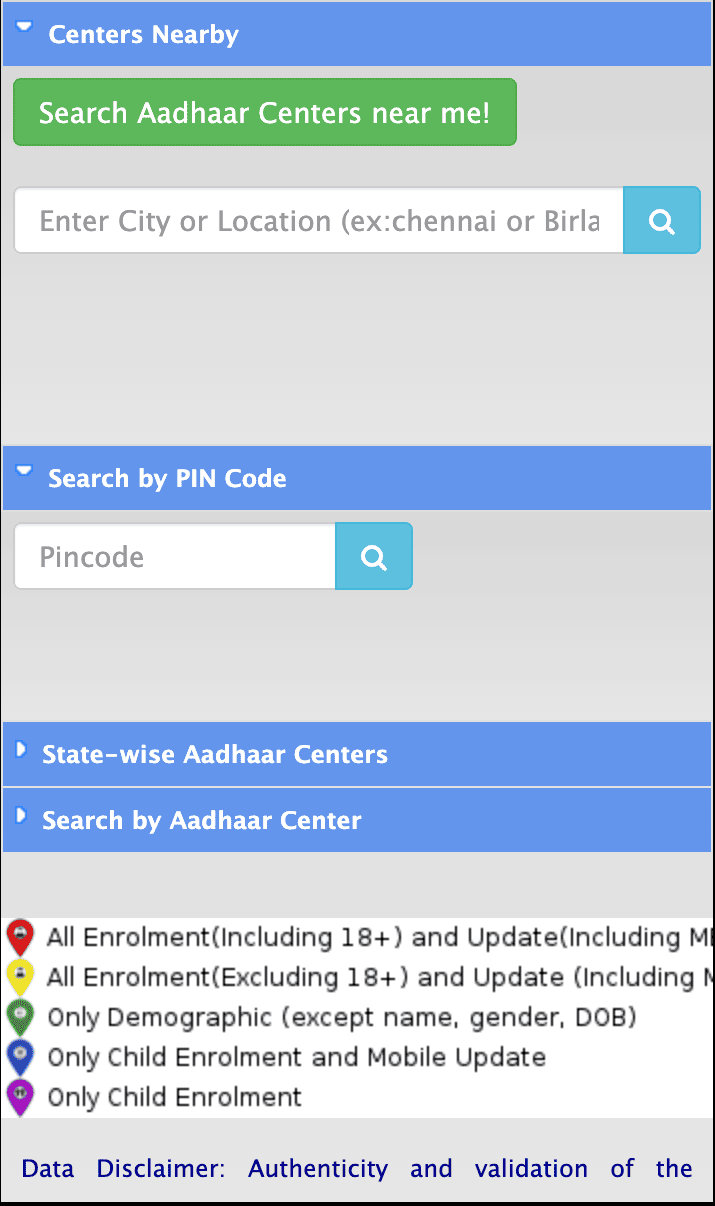
If your mobile number isn't linked to Aadhaar, or you're not comfortable with the online process, you can visit any Aadhaar Enrolment Centre / Aadhaar Seva Kendra (ASK) near you. Carry your original Proof of Address document, fill out the update form there, and provide biometric verification. They'll give you an acknowledgement slip with your SRN.
How to Update Your Documents (PoI and PoA)
This one is separate from updating your actual details. Even if your name, address, and everything else is correct, UIDAI allows you to update the supporting documents in their system. This is useful if you originally enrolled with a weaker document and now have something stronger like a passport or voter ID.
- Visit myaadhaar.uidai.gov.in and log in with Aadhaar + OTP
- Click on "Document Update" from the dashboard

- Verify that your demographic details shown on screen are correct, then tick the confirmation box and click Next
- Upload your Proof of Identity (PoI) and Proof of Address (PoA) documents
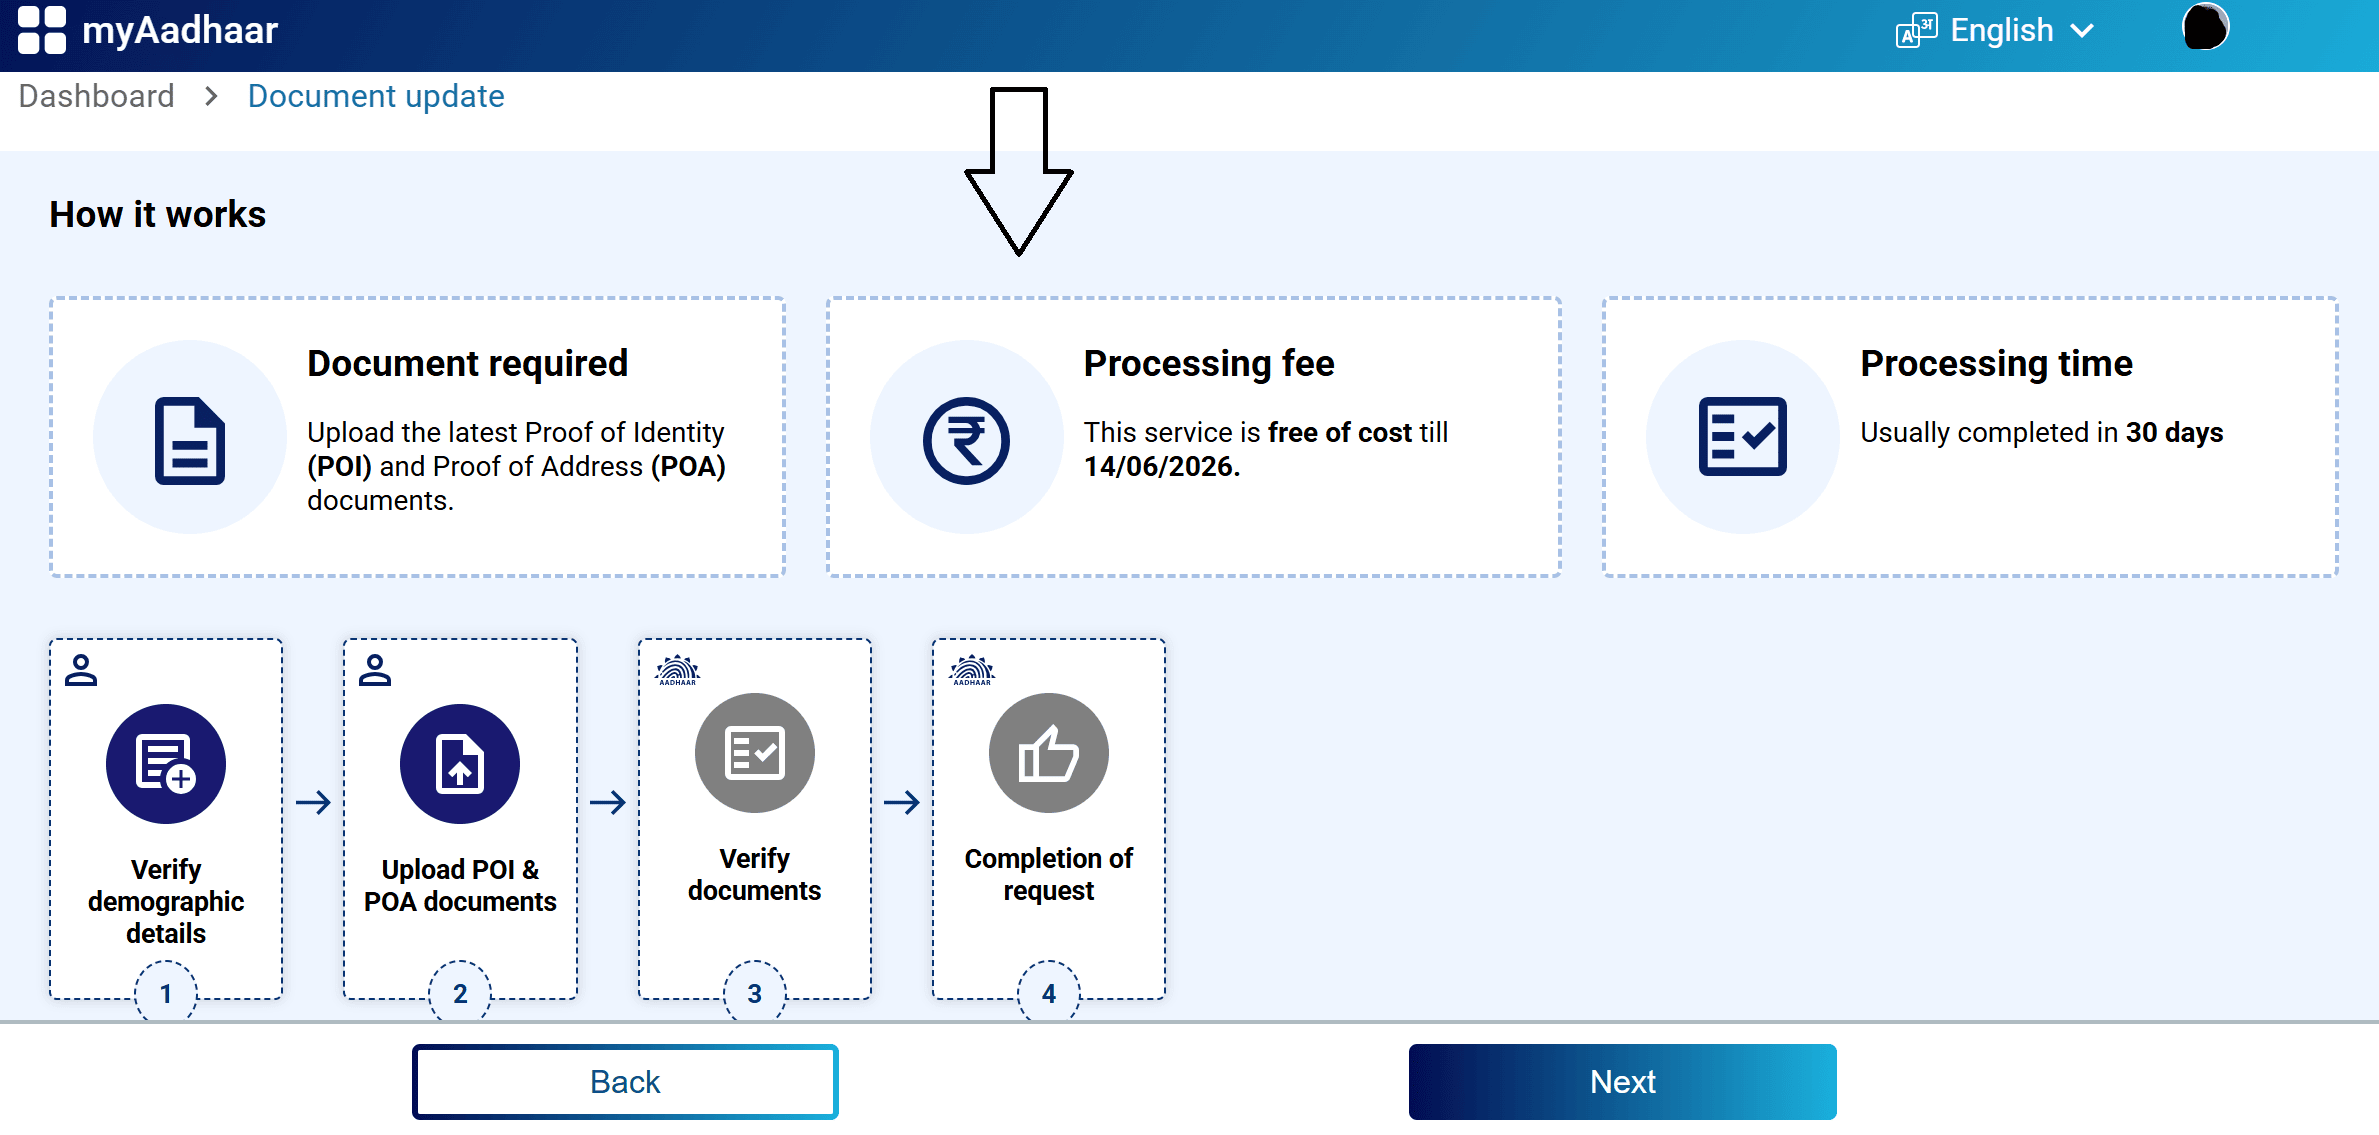
- Give your consent for verification and click Submit
How to Update Your Mobile Number
Your mobile number is the key to almost every Aadhaar service. Without a linked number, you can't download your e-Aadhaar, can't receive OTPs, and can't do any online updates. So if your number has changed, updating it should be a priority.
UIDAI's new Aadhaar app now lets you update your mobile number directly from your phone without visiting a centre. Here's how:
- Download and open the Aadhaar app on your phone
- Sign in using your Aadhaar number and the app's security method (MPIN or OTP)
- Go to "Services" and select "Update Mobile Number"
- Enter your new mobile number
- An OTP will be sent to the new number for verification
- Complete face authentication using your phone camera (this confirms you are the actual Aadhaar holder)
- Pay the ₹75 update fee through the app
After payment and verification, your request gets submitted. The change usually reflects within 15 to 30 days, and you'll get an SMS confirmation on your new number once it's done.
How to Update Biometrics (Fingerprints, Iris, Photo)
Biometric updates cannot be done online. You have to visit an Aadhaar centre in person. This is typically needed when:
- A child enrolled before age 5 needs mandatory biometric updates at age 5 and again at age 15
- Your fingerprint authentication keeps failing (common with older people or those who do manual labour)
- You want to update your photograph
Here's the process:
- Visit an Aadhaar Seva Kendra (ASK) or any authorised Aadhaar Enrolment Centre
- Tell the operator you need a biometric update
- They'll pull up your Aadhaar record and ask you to confirm your details on screen
- Your 10 fingerprints will be scanned one by one
- Your iris scan will be captured (you'll need to look straight into the device for a few seconds)
- A fresh photograph will be taken
- The operator will complete the submission using biometric authentication
You'll receive an acknowledgement slip with your URN (Update Request Number), the date, and the type of update requested.
Fee: ₹125 for adults. Free for children during their first mandatory biometric update.
Processing time: Biometric updates can take anywhere from 15 to 60 days to reflect.
How to Update Your Name, Date of Birth, or Gender
These are more sensitive fields and come with some restrictions. You can't change them unlimited times:
| Field | How Many Times Can You Update? |
|---|---|
| Name | Maximum 2 times |
| Date of Birth | Maximum 1 time |
| Gender | Maximum 1 time |
| Address | Unlimited |
| Mobile Number | Unlimited |
| Unlimited |
You can start the process online through the myAadhaar portal, but depending on the nature of the change, UIDAI may ask you to visit a centre for biometric verification as well.
How to Track Your Aadhaar Update Status
Every update request generates either an SRN (Service Request Number) or URN (Update Request Number). You can use these to check where things stand.
- Go to myaadhaar.uidai.gov.in
- Click on "Check Enrolment or Update Status"
- Enter your SRN or URN
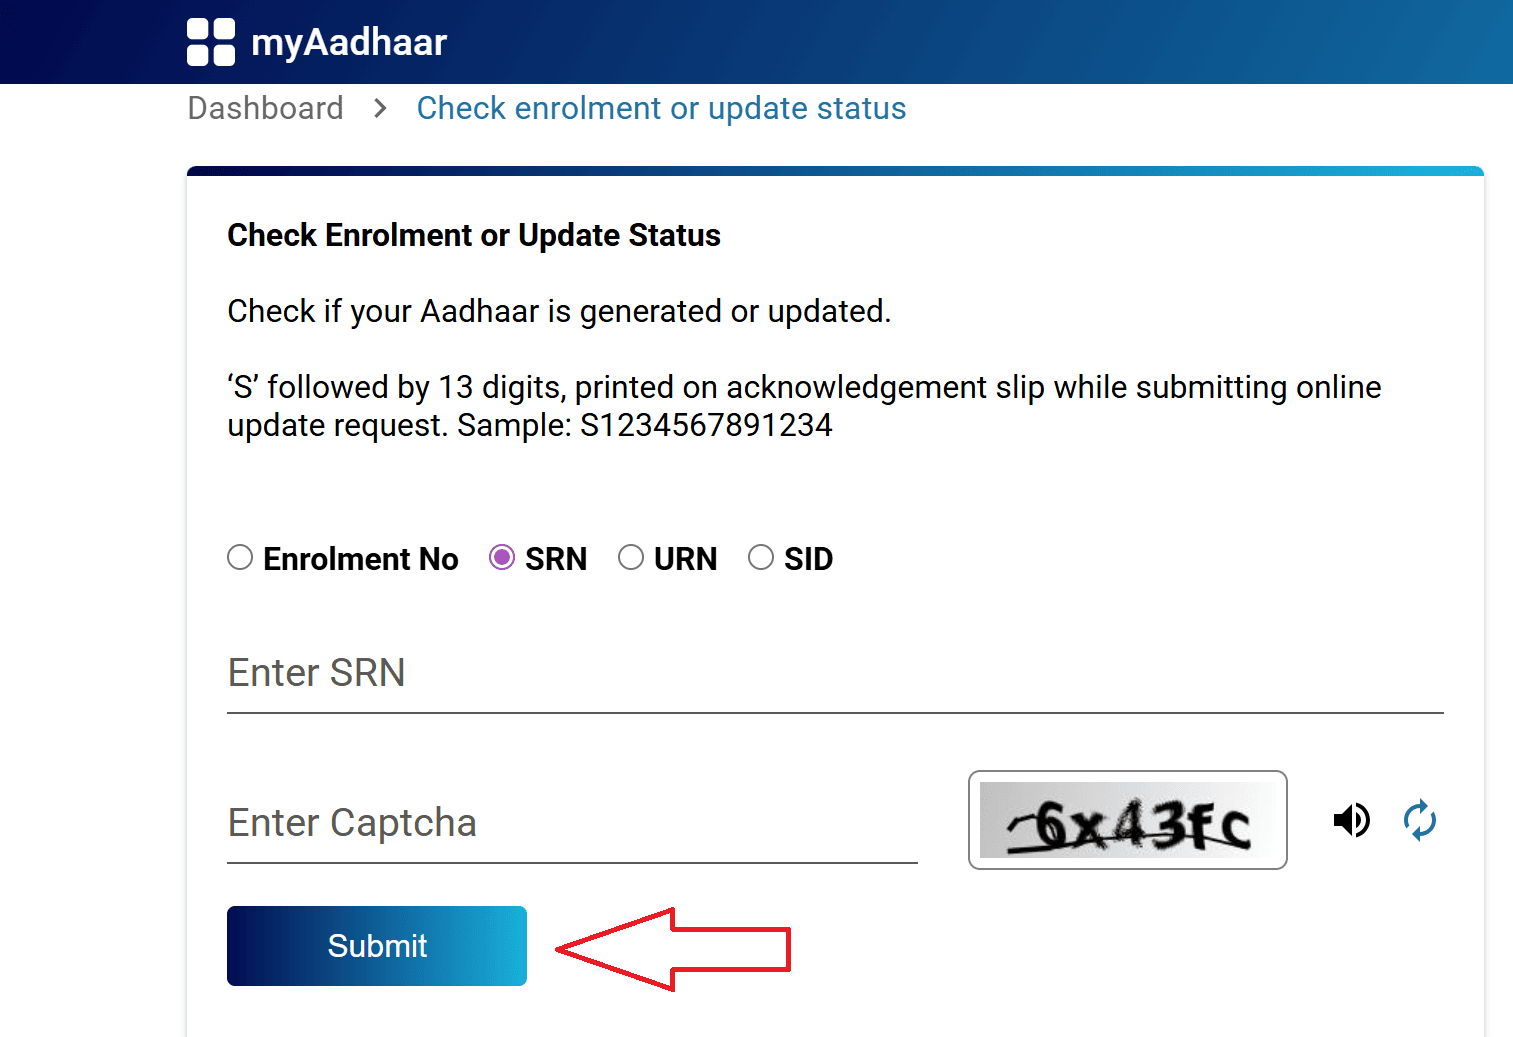
- Fill in the captcha and click Submit
You'll see whether your request is under review, approved, or rejected.
Documents You'll Need for Different Updates
Here's a reference table of commonly accepted documents and what they can be used for:
| Document | Proof of Identity | Proof of Address | Proof of DOB | Proof of Relationship |
|---|---|---|---|---|
| Indian Passport | Yes | Yes | Yes | Yes |
| PAN Card / e-PAN | Yes | No | No | No |
| Voter ID / e-Voter | Yes | Yes | No | No |
| Ration / PDS Photo Card | Yes | Yes | No | Yes |
| Driving Licence | Yes | No | No | No |
| Birth Certificate | No | No | Yes | No |
| School Leaving / Transfer Certificate (with photo) | Yes | No | Yes | No |
| Utility Bills (Electricity/Water/Gas) | No | Yes | No | No |
| Bank / Post Office Passbook (with photo) | Yes | Yes | No | No |
| Marriage Certificate (with photo) | Yes | No | No | No |
| Disability ID Card / Certificate | Yes | Yes | No | No |
| Govt. Service Photo ID | Yes | No | Yes | No |
| Pensioner / Freedom Fighter ID | Yes | No | Yes | Yes |
Why Do Update Requests Get Rejected?
If your update gets rejected, it's usually because of one of these reasons:
- Document issues: The document is expired, the scan is blurry or cropped, or the document doesn't match the data you entered. For example, if you entered a slightly different spelling of your name than what's on the uploaded document, that's a mismatch.
- Data inconsistency: The address format you typed doesn't match what's on your Proof of Address. Or the date of birth format is wrong.
- Limit exceeded: You've already used up your allowed updates for a particular field (like trying to change your name a third time).
- Wrong update type: Trying to do a biometric update online, which isn't allowed.
If your request is rejected, you can usually resubmit with corrected documents. Check the rejection reason carefully before trying again.
Important Notes
1. The free document update window ends on 14 June 2026.
If you haven't updated your PoI and PoA documents in a while, do it now through the myAadhaar portal while it's free. After the deadline, you'll need to visit a centre and pay ₹75.
2. Always use official portals and apps.
The only legitimate sources for Aadhaar services are:
- myaadhaar.uidai.gov.in
- uidai.gov.in
- Aadhaar app (by UIDAI)
- mAadhaar app (by UIDAI)
- DigiLocker (by Government of India)
- UMANG app (by Government of India)
Never share your OTP, Aadhaar number, or personal details with unknown callers or third-party websites.
3. Keep your mobile number updated and active.
Almost every Aadhaar service depends on OTP verification. If your linked number goes inactive or you switch to a new one without updating, you'll be locked out of online services.
4. Children need mandatory biometric updates.
If your child was enrolled before age 5, their biometrics must be updated after they turn 5, and then again at 15. Missing these can cause issues with school admissions and other services later.
5. Your photo can be updated anytime.
There's no limit on how many times you can update your photograph. If your current Aadhaar photo is very old and doesn't look like you anymore, visit a centre and get it refreshed. It costs ₹125 as part of the biometric update.
6. Save your SRN/URN.
Always note down or screenshot the Service Request Number or Update Request Number you get after submitting a request. Without it, you won't be able to track your update status.
7. Don't rush unnecessary updates.
UIDAI discourages repeated or unnecessary changes. Only update what genuinely needs to be corrected. Frequent changes to fields like name or DOB may trigger additional verification or delays.
8. For any issues, call 1947.
UIDAI's toll-free helpline at 1947 is available for queries, complaints, and assistance. You can also email help@uidai.gov.in or visit uidai.gov.in for the latest guidelines.
Aadhaar Guides — Related Articles
Detailed guides covering Aadhaar card download, update, enrolment, PAN linking, and more.
Step 1: Open the MyAadhaar Portal · Step 2: Click on "Virtual ID (VID) Generator" · Step 3: Select "Generate VID" or "Retrieve VID" · Step 4: Enter Your Aadhaar Number and Captcha · Step 5: Request and Enter OTP · Step 6: Receive Your 16-Digit VID via SMS.
Aadhaar Complaint & GrievanceIf you're dealing with an Aadhaar problem, whether it's a wrong name, failed fingerprint, this guide walks you through exactly how to file a complaint and what to expect.
Aadhaar Card Download GuideLearn how to download your Aadhaar card online using the UIDAI portal, mAadhaar app, DigiLocker, and other official methods. Step by step, simple and quick.
Aadhaar Card Status GuideCheck your Aadhaar card status online for enrolment, update, and PVC card requests using myAadhaar portal, mAadhaar app, and UMANG app. You can also track your Aadhaar status by calling the UIDAI helpline at 1947.
Aadhaar Card Update GuideLearn how to update your Aadhaar card online and offline using the UIDAI portal, mAadhaar app, and nearest Aadhaar centre. Update your name, address, date of birth, mobile number, email, and photo easily.
My Aadhaar UIDAI Login GuideStep 1: Open the MyAadhaar Portal · Step 2: Enter Your Aadhaar Number · Step 3: Enter the Captcha · Step 4: Request OTP · Step 5: Enter OTP and Login.
Aadhaar Enrolment GuideLearn how to enrol for a new Aadhaar card in 2026. This guide covers required documents, appointment booking, and the step-by-step enrolment process for adults, children, NRIs, and foreign nationals.
Order Aadhaar PVC Card GuideLearn how to order your Aadhaar PVC card online through the myAadhaar portal and mAadhaar app. Check your PVC card order status, track delivery, fees, required documents, etc.
Retrieve Aadhaar Number GuideLearn how to retrieve your lost or forgotten Aadhaar number online and offline using the myAadhaar portal, mAadhaar app, the new Aadhaar app, the UIDAI helpline 1947, or by visiting an Aadhaar Enrolment Centre.
Aadhaar PAN Link GuideLearn how to link your PAN with Aadhaar online, via SMS, and offline using the Income Tax portal. Step-by-step guide covering link status check, late fee payment, name mismatch fix, PAN reactivation, and exemptions.
mAadhaar AppLearn everything about the mAadhaar app. Download, setup, all features explained (VID, TOTP, biometric lock, eKYC, and more), and how it differs from the new Aadhaar app launched in 2026.
New Aadhaar App 2026Learn everything about the new Aadhaar app launched by UIDAI in 2026. Selective sharing, face authentication, offline verification, and mobile number update. Complete setup guide.
Protect Your AadhaarLearn how to protect your Aadhaar from misuse using biometric lock, Virtual ID, masked Aadhaar, Aadhaar Authentication History, and more. Step by step, simple and practical.
Aadhaar Authentication FailedLearn how to fix Aadhaar authentication failures caused by locked biometrics, worn fingerprints, server issues, and data mismatches. Step by step, simple and practical.
Aadhaar Enabled Payment SystemLearn how AePS (Aadhaar Enabled Payment System) lets you withdraw cash, check your balance, and receive government benefits using just your Aadhaar number and fingerprint.