Aadhaar Enrolment Guide
Learn how to enrol for a new Aadhaar card in 2026. This guide covers required documents, appointment booking, and the step-by-step enrolment process for adults, children, NRIs, and foreign nationals.
What is Aadhaar Enrolment?
Aadhaar enrolment is the one-time process where UIDAI collects your personal details (name, address, date of birth, gender) and biometric data (fingerprints, iris scans, photograph) to generate a unique 12-digit Aadhaar number for you.
Once enrolled, you can download your e-Aadhaar (a downloadable digital copy), and UIDAI also sends a physical Aadhaar letter to your address by post. You can later order a PVC card if you want a durable, wallet-sized version.
- Aadhaar enrolment is completely free. No one should charge you for it.
- It's voluntary, not mandatory. But practically speaking, you'll need it for bank accounts, SIM cards, government schemes, tax filing, and a lot more.
- Aadhaar is not proof of citizenship. It's an identity and address verification document for residents of India. This has been clarified by both UIDAI and the Supreme Court.
Who Can Enrol for Aadhaar?
- Indian citizens of any age, from newborns to senior citizens
- Non-Resident Indians (NRIs) who have an Indian address and meet residency requirements
- Foreign nationals residing in India for 182 days or more in the 12 months before enrolment (with valid passport and visa)
What Documents Do You Need?
You'll need to carry documents for three things: proving your identity, proving your address, and proving your date of birth. In most cases, a single document can serve as proof for more than one purpose.
Proof of Identity (PoI)
Any one of these with your name and photo:
- Passport
- PAN card
- Voter ID
- Driving licence
- Ration card with photo
- Government-issued ID card
- School or college ID with photo
- Marriage certificate (with photo and name)
Proof of Address (PoA)
Any one of these with your current address:
- Passport
- Voter ID
- Driving licence
- Ration card
- Utility bill (electricity, water, gas) not older than 3 months
- Bank or post office passbook with address
- Property tax receipt (not older than 1 year)
- Rent or lease agreement
- Employer letter on official letterhead
Proof of Date of Birth (DoB)
Any one of these:
- Birth certificate
- SSLC or 10th class certificate
- Passport
- PAN card
- Certificate from a government hospital or school
For Children
- Parent or guardian's Aadhaar number (mandatory)
- Child's birth certificate (serves as both DoB proof and Proof of Relationship)
- For children under 5, only a photograph is needed. No fingerprints or iris scan.
For Foreign Nationals
- Valid passport with visa
- OCI or PIO card (if applicable)
- Indian address proof (rental agreement, utility bill, etc.)
How to Book an Appointment (Optional)
You can walk into any Aadhaar enrolment centre without an appointment, but booking an appointment online lets you pick a date and time slot.
- Go to appointments.uidai.gov.in
- Select your city and choose a nearby Aadhaar Seva Kendra (ASK) or Registrar-run centre
- Pick the service you need (select "New Aadhaar Enrolment")
- Enter your mobile number (doesn't need to be Aadhaar-registered) and verify with OTP
- Fill in the form with your details and choose a date and time
- Confirm the appointment and note your Token ID
A few things about appointments:
- Booking is free of charge
- You can book for yourself or a family member
- Maximum 4 appointments per month per person
- You can reschedule or cancel anytime from the same portal using your Token ID
- Walk-ins are still accepted at most centres, but appointment holders get priority
- The last token for walk-ins is usually given at 5:30 PM
The Enrolment Process (What Happens at the Centre)
Here's what to expect when you visit the enrolment centre:
1. Carry Your Documents
Bring the originals of your Proof of Identity, Proof of Address, and Proof of Date of Birth. Also carry photocopies. The operator will verify the originals and return them to you.
2. Fill the Enrolment Form
You'll get an enrolment form at the centre (you can also download it from the UIDAI website beforehand). Fill in your name, gender, date of birth, full address, mobile number, and email (optional). For children, the parent or guardian fills the form and provides their own Aadhaar number.
Take your time with the form. Whatever you write here is what goes on your Aadhaar. Spelling mistakes in your name or errors in your address can cause problems later, and correcting them requires a separate update request.
3. Document Verification
The operator at the centre checks your documents against what you've filled in the form. They enter your details into the UIDAI system. Your originals are returned after verification.
4. Biometric Data Collection
- Photograph: A front-facing photo is taken at the centre
- Fingerprints: All 10 fingerprints are scanned one by one
- Iris scan: Both eyes are scanned (you'll need to look into a device for a few seconds)
For children under 5: Only a photograph is taken. No fingerprints or iris scan. This is called Baal Aadhaar (more on this below).
5. Review and Confirm
Before submitting, the operator shows you a summary of the data entered. Check your name, date of birth, address, and gender carefully. If anything looks wrong, get it corrected right there. It's much easier to fix at this stage than after your Aadhaar is generated.
6. Collect Your Acknowledgement Slip
After submission, you receive an acknowledgement slip with your 28-digit Enrolment ID (EID). This EID is made up of a 14-digit enrolment number and a 14-digit date/time stamp.
Keep this slip safe. You'll need the EID to check your enrolment status and to download your e-Aadhaar once it's generated.
Aadhaar for Children (Baal Aadhaar)
Children's Aadhaar enrolment works a bit differently depending on their age.
Children Under 5 Years
Kids below 5 get a Baal Aadhaar, which is a blue-coloured card. Here's how it works:
- Only a photograph is captured. No fingerprints, no iris scan.
- A parent or guardian must be present and provide their own Aadhaar number
- You'll need the child's birth certificate as Proof of Relationship and Date of Birth
- The child's Aadhaar is linked to the parent's Aadhaar
Baal Aadhaar is valid until the child turns 5. After that, a mandatory biometric update is needed where fingerprints and iris scans are collected for the first time.
Children Aged 5 to 15
From age 5 onwards, the process is the same as adults. Full biometrics (fingerprints, iris, photo) are collected. You can use the parent's Aadhaar along with a Proof of Relationship document, or the child's own PoI and PoA if available.
Mandatory Biometric Updates
UIDAI requires two biometric updates for children:
- After turning 5: First mandatory update (free of charge)
- After turning 15: Second mandatory update (free of charge)
Missing these updates can cause issues with Aadhaar-based authentication and linked services later on. It's best to get them done on time.
What If You Don't Have Documents?
Not everyone has a passport, voter ID, or utility bill in their name. UIDAI has provisions for people who lack standard documents.
Introducer-Based Enrolment
An Introducer is a person authorized by UIDAI (such as a government official, NGO representative, or community leader) who can vouch for your identity and address. Here's how it works:
- Visit an Aadhaar enrolment centre that supports Introducer-based enrolment (not all do, so call 1947 to find one near you)
- The Introducer comes with you and verifies your identity on the enrolment form
- You provide your biometric data as usual
- You receive the acknowledgement slip with your EID
Head of Family (HoF) Based Enrolment
If a family member (parent, spouse, etc.) already has Aadhaar, they can help you enrol through the Head of Family system:
- The HoF provides their Aadhaar number and a Proof of Relationship document (like a ration card, marriage certificate, or birth certificate)
- You fill the enrolment form with your details
- The HoF must be present during enrolment
- You provide your biometric data and receive the EID
This is especially useful for homemakers, elderly family members, or anyone who doesn't have documents in their own name.
Enrolment for NRIs and Foreign Nationals
NRIs
NRIs can enrol for Aadhaar as long as they have a valid Indian address proof. They'll need:
- Indian passport (or passport with valid visa)
- Indian address proof (utility bill, bank passbook, rental agreement, etc.)
Foreign Nationals
Foreign nationals residing in India can also enrol, provided they've been living in India for 182 days or more in the 12 months before enrolment. Documents needed:
- Valid passport with visa
- Indian address proof
What Happens After Enrolment
Once you walk out of the centre with your acknowledgement slip, here's what to expect:
Check Your Status
Your Aadhaar number is usually generated within 5 to 15 working days, though UIDAI officially says it can take up to 90 days in some cases. You'll get an SMS or email notification once it's ready.
To check manually:
- Go to myaadhaar.uidai.gov.in
- Click "Check Enrolment or Update Status"
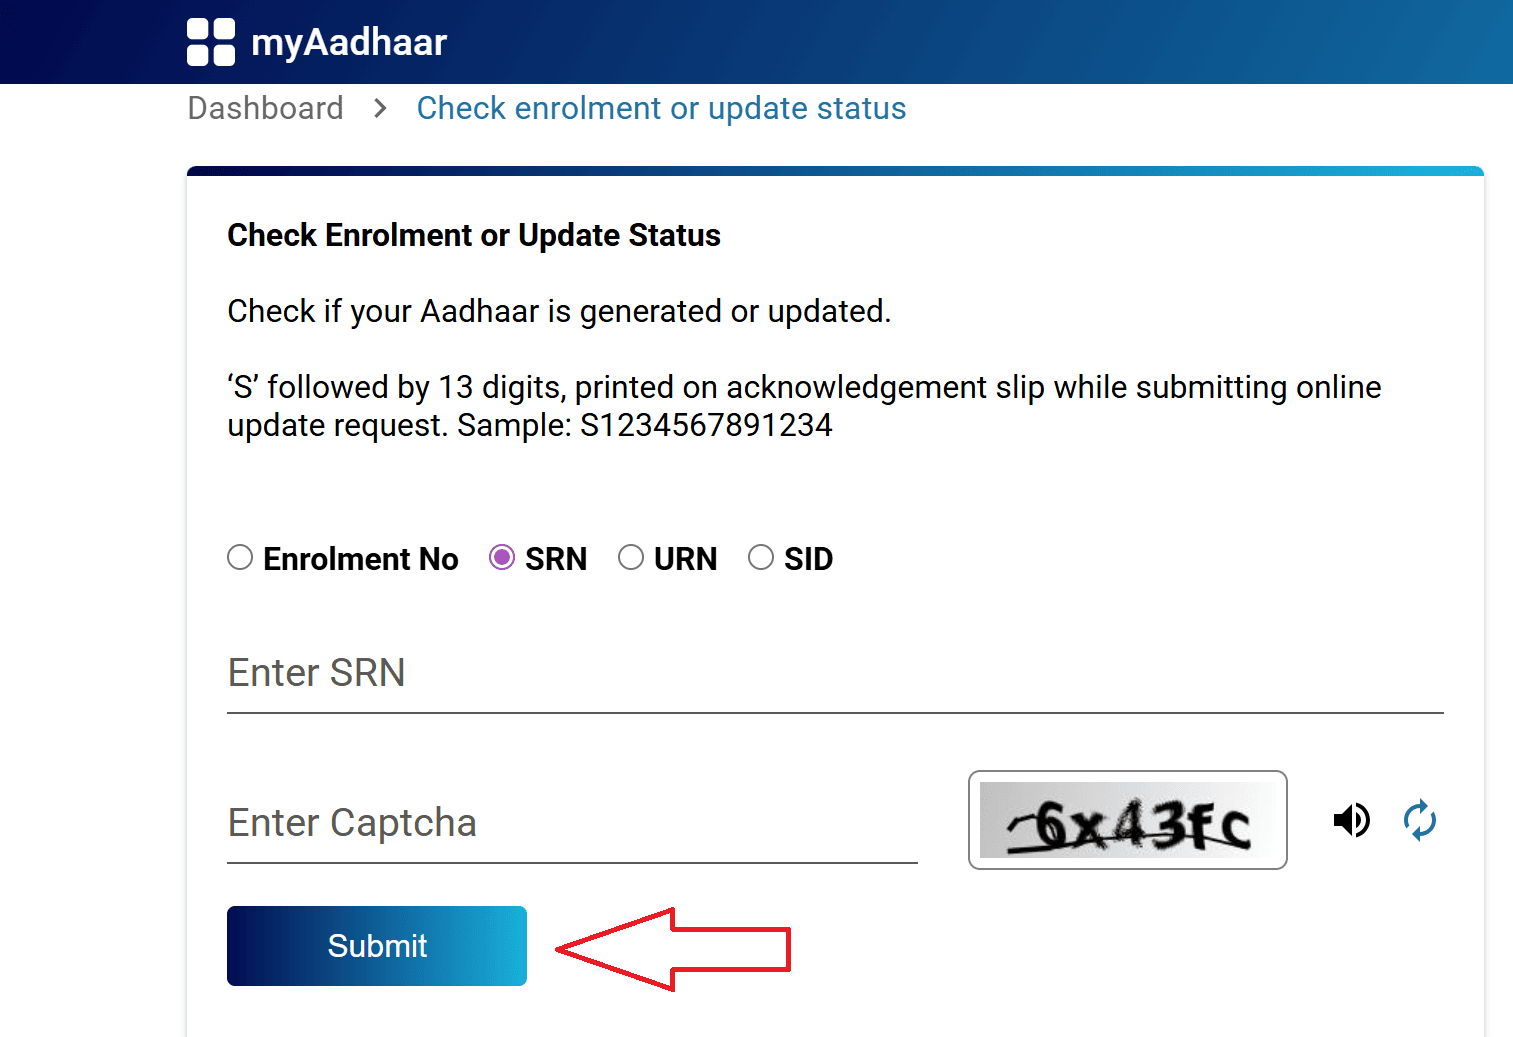
- Enter your 28-digit EID and captcha
- Click Submit to see the current stage
Download Your e-Aadhaar
Once the status shows "Aadhaar Generated" or "Completed," you can download your e-Aadhaar:
- Go to myaadhaar.uidai.gov.in
- Click "Download Aadhaar"
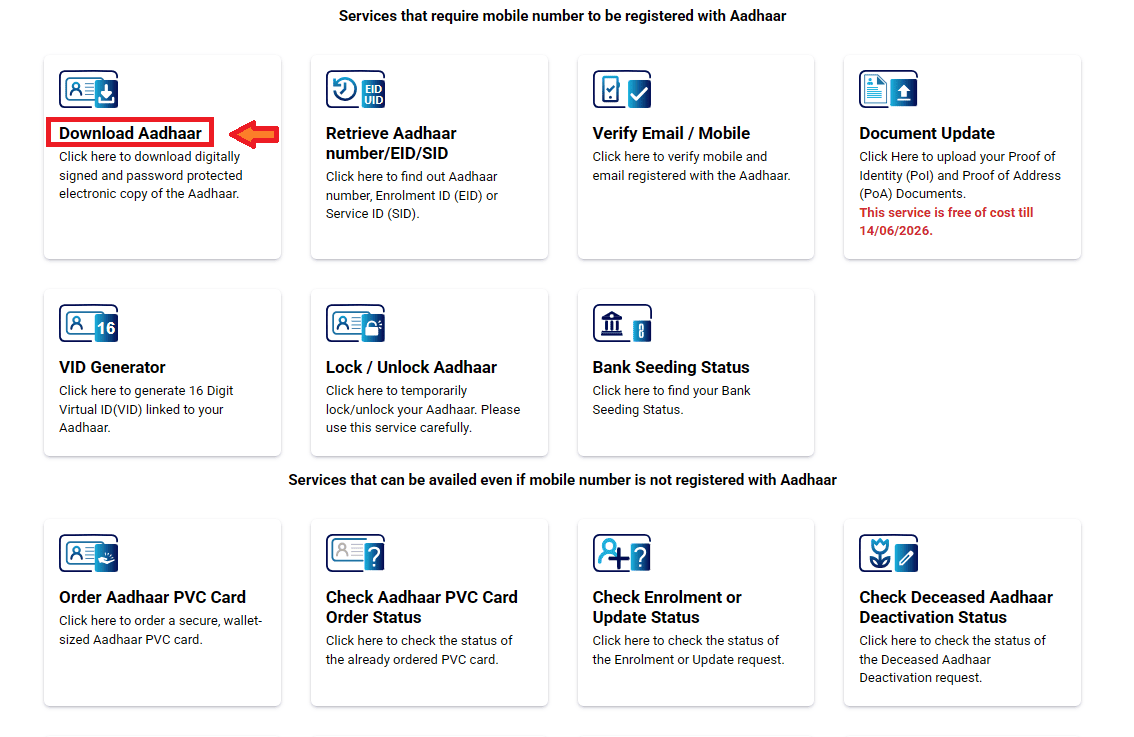
- Enter your Aadhaar number or EID and verify with OTP
- Download the PDF
Receive the Aadhaar Letter by Post
UIDAI also sends a physical Aadhaar letter to your registered address through India Post. This can take up to 90 days. But since you can download the e-Aadhaar much sooner, you don't need to wait for the letter.
Order a PVC Card (Optional)
If you want a durable, credit card sized Aadhaar, you can order a PVC card from the myAadhaar portal for ₹75. Delivery takes about 10 to 20 working days.
Enrolment Fees and Charges
| Service | Cost |
|---|---|
| New Aadhaar enrolment | Free |
| Booking an appointment | Free |
| e-Aadhaar download | Free |
| Aadhaar letter by post | Free |
| PVC Aadhaar card | ₹75 |
| Demographic updates (name, address, DOB, etc.) | ₹75 at centres (free online until 14 June 2026) |
| Biometric updates for adults | ₹125 |
| Biometric updates for children (mandatory updates) | Free |
Important Notes
1. Enrol only at authorized centres
Use UIDAI's official locator at appointments.uidai.gov.in or call 1947 to find legitimate Aadhaar Seva Kendras and Permanent Enrolment Centres. Avoid random agents or shops that offer "Aadhaar services" without official authorization.
2. Double-check everything on the form before submission.
Once your data is submitted, any correction requires a separate update request (which takes time and may cost money). Spelling errors in your name, wrong date of birth, or incorrect address are all common mistakes that happen when people rush through the form.
3. Register your mobile number.
During enrolment, providing a mobile number is optional. But I'd strongly recommend giving one. Almost every Aadhaar service after enrolment (downloading, updating, tracking status) requires OTP verification through a linked mobile number. Without it, you'll be locked out of all online services.
4. Keep the acknowledgement slip safe.
The 28-digit EID on the slip is your only reference until your Aadhaar is generated. If you lose it, you'll need to use the Retrieve EID option on the myAadhaar portal (which requires a registered mobile number or email).
5. Don't share your biometrics or OTP with anyone.
UIDAI will never call or message you asking for your Aadhaar number, OTP, or biometric data. If someone does, it's a scam.
6. Biometric updates for children are mandatory.
If your child was enrolled before age 5, remember to get their biometrics updated after they turn 5, and again after 15. These updates are free, but missing them can cause authentication issues.
7. You can enrol at any centre in India.
You're not restricted to your home city or state. If you're currently staying somewhere else for work or education, you can enrol at any authorized centre in that area. Just carry your documents.
8. For help, call 1947.
UIDAI's toll-free helpline is available 24/7 through the automated system, with agent support from 7 AM to 11 PM (Monday to Saturday). You can also email help@uidai.gov.in for assistance in Hindi, English, Tamil, Telugu, Kannada, and several other languages.
Aadhaar Guides — Related Articles
Detailed guides covering Aadhaar card download, update, enrolment, PAN linking, and more.
Step 1: Open the MyAadhaar Portal · Step 2: Click on "Virtual ID (VID) Generator" · Step 3: Select "Generate VID" or "Retrieve VID" · Step 4: Enter Your Aadhaar Number and Captcha · Step 5: Request and Enter OTP · Step 6: Receive Your 16-Digit VID via SMS.
Aadhaar Complaint & GrievanceIf you're dealing with an Aadhaar problem, whether it's a wrong name, failed fingerprint, this guide walks you through exactly how to file a complaint and what to expect.
Aadhaar Card Download GuideLearn how to download your Aadhaar card online using the UIDAI portal, mAadhaar app, DigiLocker, and other official methods. Step by step, simple and quick.
Aadhaar Card Status GuideCheck your Aadhaar card status online for enrolment, update, and PVC card requests using myAadhaar portal, mAadhaar app, and UMANG app. You can also track your Aadhaar status by calling the UIDAI helpline at 1947.
Aadhaar Card Update GuideLearn how to update your Aadhaar card online and offline using the UIDAI portal, mAadhaar app, and nearest Aadhaar centre. Update your name, address, date of birth, mobile number, email, and photo easily.
My Aadhaar UIDAI Login GuideStep 1: Open the MyAadhaar Portal · Step 2: Enter Your Aadhaar Number · Step 3: Enter the Captcha · Step 4: Request OTP · Step 5: Enter OTP and Login.
Aadhaar Enrolment GuideLearn how to enrol for a new Aadhaar card in 2026. This guide covers required documents, appointment booking, and the step-by-step enrolment process for adults, children, NRIs, and foreign nationals.
Order Aadhaar PVC Card GuideLearn how to order your Aadhaar PVC card online through the myAadhaar portal and mAadhaar app. Check your PVC card order status, track delivery, fees, required documents, etc.
Retrieve Aadhaar Number GuideLearn how to retrieve your lost or forgotten Aadhaar number online and offline using the myAadhaar portal, mAadhaar app, the new Aadhaar app, the UIDAI helpline 1947, or by visiting an Aadhaar Enrolment Centre.
Aadhaar PAN Link GuideLearn how to link your PAN with Aadhaar online, via SMS, and offline using the Income Tax portal. Step-by-step guide covering link status check, late fee payment, name mismatch fix, PAN reactivation, and exemptions.
mAadhaar AppLearn everything about the mAadhaar app. Download, setup, all features explained (VID, TOTP, biometric lock, eKYC, and more), and how it differs from the new Aadhaar app launched in 2026.
New Aadhaar App 2026Learn everything about the new Aadhaar app launched by UIDAI in 2026. Selective sharing, face authentication, offline verification, and mobile number update. Complete setup guide.
Protect Your AadhaarLearn how to protect your Aadhaar from misuse using biometric lock, Virtual ID, masked Aadhaar, Aadhaar Authentication History, and more. Step by step, simple and practical.
Aadhaar Authentication FailedLearn how to fix Aadhaar authentication failures caused by locked biometrics, worn fingerprints, server issues, and data mismatches. Step by step, simple and practical.
Aadhaar Enabled Payment SystemLearn how AePS (Aadhaar Enabled Payment System) lets you withdraw cash, check your balance, and receive government benefits using just your Aadhaar number and fingerprint.