Protect Your Aadhaar from Misuse
Learn how to protect your Aadhaar from misuse using biometric lock, Virtual ID, masked Aadhaar, Aadhaar Authentication History, and more. Step by step, simple and practical.
How to Protect Your Aadhaar from Misuse
Aadhaar is widely used for identity verification across banks, government services, SIM verification, and welfare schemes. Because it is linked to your biometric and demographic data, protecting it from misuse is important.
Fortunately, the UIDAI provides several built-in security features that help you stay in control of how your Aadhaar is used. These include locking your biometrics, generating a Virtual ID (VID), downloading a masked Aadhaar, and checking your Aadhaar authentication history to monitor activity.
| Sr. No. | Protection Methods |
|---|---|
| 1 | Lock / Unlock Your Biometrics |
| 2 | Generate and Use Virtual ID (VID) |
| 3 | Download and Use Masked Aadhaar |
| 4 | Check Aadhaar Authentication History |
| 5 | File a Complaint with UIDAI |
Lock Your Biometrics
Your biometric data (fingerprints and iris scans) is what makes Aadhaar uniquely powerful as an identity tool. It's also what makes it uniquely risky.
You don't use biometric authentication on a daily basis. Most of the time, Aadhaar verification happens through OTP. So for the 99% of the time you're not actively using biometric authentication, there's zero reason to leave it unlocked and exposed.
Biometric locking is a feature that completely disables biometric-based authentication on your Aadhaar. Once locked, nobody can use your fingerprints or iris data for any Aadhaar authentication.
How to Lock Biometrics on the myAadhaar Portal
- Step 1: Go to myaadhaar.uidai.gov.in and log in with your Aadhaar number and OTP.
- Step 2: Find "Lock/Unlock Biometrics" under the Aadhaar Services section.
- Step 3: Read the guidelines, then click Next.
- Step 4: Enter the security code and click "Enable" to lock your biometrics.
How to Lock Biometrics on the mAadhaar App
If you prefer doing this on your phone:
- Open the mAadhaar app and log in with your registered mobile number
- Tap the three vertical dots in the upper right corner
- Select "Biometric Settings"
- Check the "Enable Biometric Locking" option and confirm
How to Lock Biometrics on the New Aadhaar App
To lock your biometrics on the new Aadhaar app:
- Log in using your Aadhaar-registered mobile number and verify via OTP or Face ID.
- Navigate to the biometric lock option within the app.
- Enable biometric locking to secure your fingerprints and iris data.
How to Lock Biometrics via SMS
You can also lock your biometrics by sending an SMS from your registered mobile number to 1947. The format is:
For example, if your Aadhaar number ends in 5678, send:
LOCKUID 5678
LOCKUID 34125678
When You Need to Unlock
When you actually need biometric authentication, say, at a bank or an Aadhaar-based payment, you can temporarily unlock your biometrics through the myAadhaar portal, the mAadhaar app, or the new Aadhaar app.
To unlock through the portal, log in to myaadhaar.uidai.gov.in, go to Lock/Unlock Biometrics, and click "Unlock." Enter the security code and verify with OTP. Your biometrics will be available for 10 minutes.
To unlock through the mAadhaar app, go to Biometric Settings, uncheck the Enable Biometric Locking option, and confirm with OTP. Same 10-minute window.
To unlock through the new Aadhaar app, open the app, navigate to the biometric lock option, and disable the lock. Verify with OTP or Face ID. Same 10-minute window applies here as well.
Lock vs Disable Biometric
If you decide you don't want biometric locking at all anymore, you can permanently disable the feature. This is only available through the UIDAI web portal (not the app). Once disabled, your biometrics remain unlocked permanently until you choose to lock them again.
Use a Virtual ID (VID) Instead of Your Aadhaar Number
Every time you share your 12-digit Aadhaar number with a bank, telecom company, or any service provider, you're handing over a permanent identifier that's linked to all your personal data. The more places your Aadhaar number exists, the higher the risk of it being leaked or misused.
UIDAI's solution for this is the Virtual ID (VID): a temporary 16-digit number that's mapped to your Aadhaar. You can use it for authentication and e-KYC purposes exactly like you'd use your Aadhaar number.
Key Things to Know About VID
- It's a 16-digit random number tied to your Aadhaar
- It can be used for any Aadhaar authentication or e-KYC service
- Agencies are required to accept VID in place of your Aadhaar number
- No agency is authorized to store your VID
- You can regenerate a new VID anytime (the old one gets deactivated)
- It's currently valid for one day, after which you can generate a new one
- It's completely free
How to Generate a VID on the myAadhaar Portal
- Step 1: Visit the UIDAI website at uidai.gov.in.
- Step 2: Click on "Virtual ID (VID) Generator" under the Aadhaar Services section.
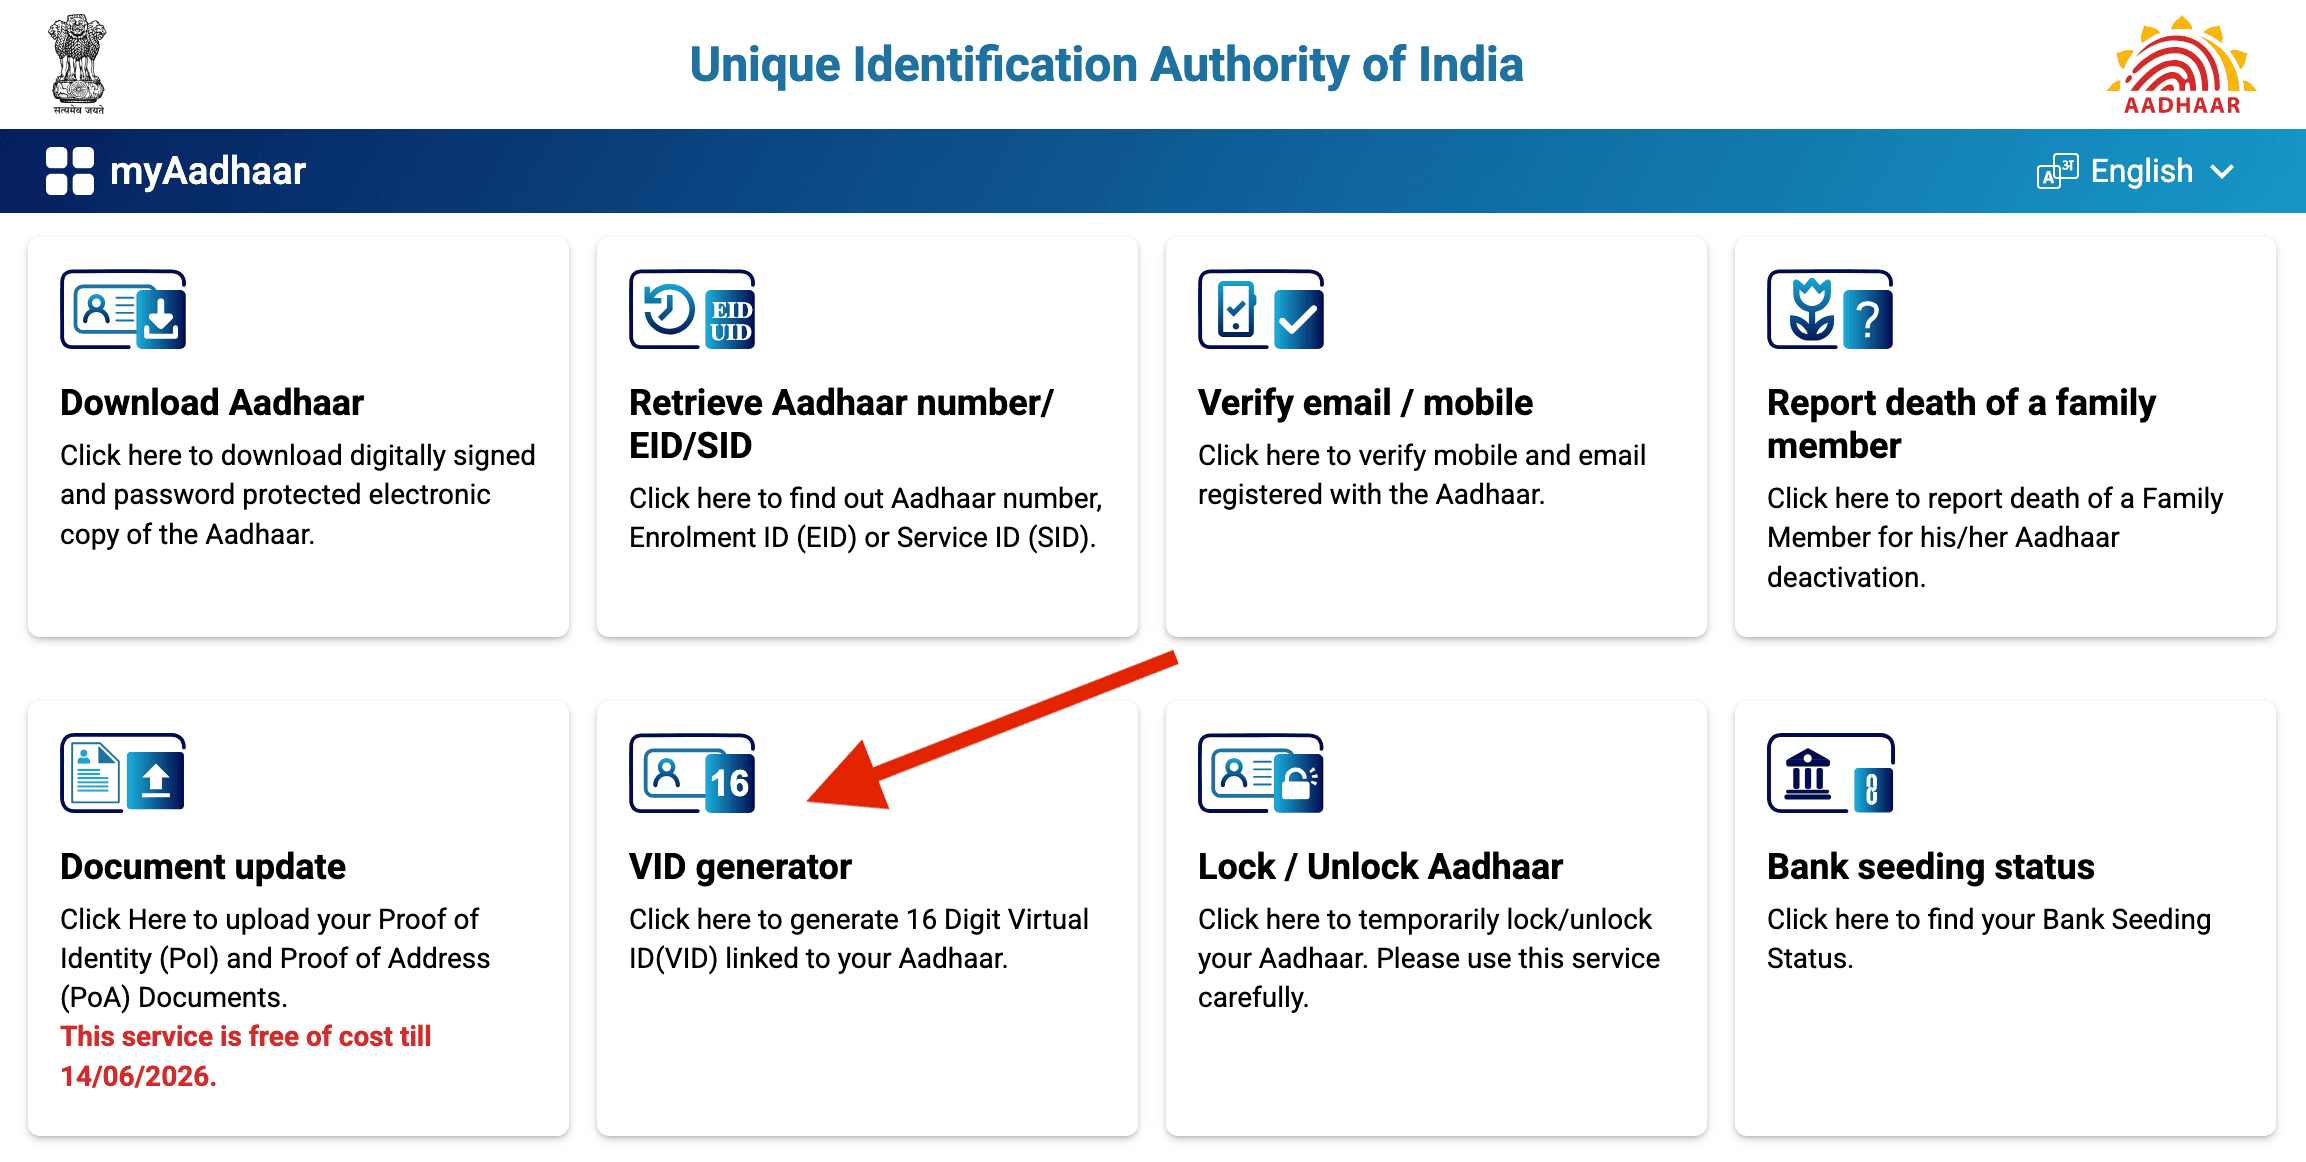
- Step 3: Enter your 12-digit Aadhaar number and the captcha code.
- Step 4: Click "Send OTP". The OTP goes to your registered mobile number.
- Step 5: Enter the OTP, select "Generate VID", and click Submit.
The 16-digit VID will appear on screen and also be sent to your registered mobile number via SMS.
How to Generate a VID on the mAadhaar App
- Open the mAadhaar app and log in
- Select "Virtual ID" from the menu
- Enter the security code and click "Generate VID"
- Your VID will be displayed on screen
How to Generate a VID via SMS
Send an SMS from your registered mobile number to 1947 in this format:
GVID [space] last 4 digits of your Aadhaar number
You'll receive your VID via SMS.
When to Use VID
Whenever a service provider asks for your Aadhaar number for verification : whether it's a bank, a mobile operator, or any other agency; give them your VID instead. If they insist on the actual Aadhaar number, know that they're not supposed to. UIDAI has mandated that all authentication agencies must accept VID.
The one situation where VID doesn't replace Aadhaar is when you need to make physical changes to your Aadhaar record itself (like updating your address or biometrics at an enrolment centre). For that, you'll need the actual Aadhaar number.
Download and Use Masked Aadhaar
A masked Aadhaar is a version of your e-Aadhaar where the first 8 digits of your Aadhaar number are hidden, showing only the last 4. So instead of displaying your full number like 9876-5432-1098, it shows XXXX-XXXX-1098.
Everything else on the card stays the same : your name, photo, date of birth, gender, address, and QR code are all visible. The document is digitally signed by UIDAI, so it's legally valid as identity proof.
Why Use Masked Aadhaar?
When you submit a photocopy of your Aadhaar for things like KYC verification, hotel check-ins, or any service that takes a copy of your ID, anyone who sees that photocopy has your full Aadhaar number. With masked Aadhaar, they can verify your identity without ever seeing the complete number.
How to Download Masked Aadhaar
- Step 1: Go to myaadhaar.uidai.gov.in and click on "Download Aadhaar".
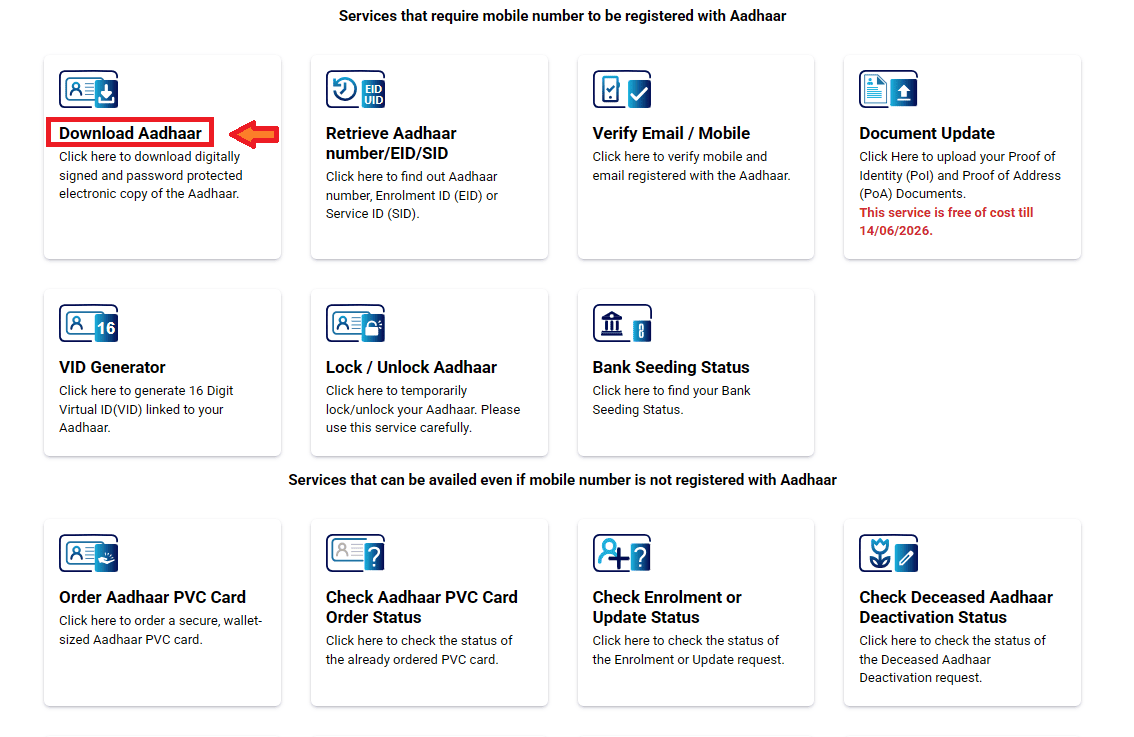
- Step 2: Choose your identification method : Aadhaar Number, Virtual ID, or Enrolment ID; and enter the details.
- Step 3: Enter the security code and click "Send OTP".
- Step 4: Before you verify the OTP, check the box that says "Do you want a masked Aadhaar?"
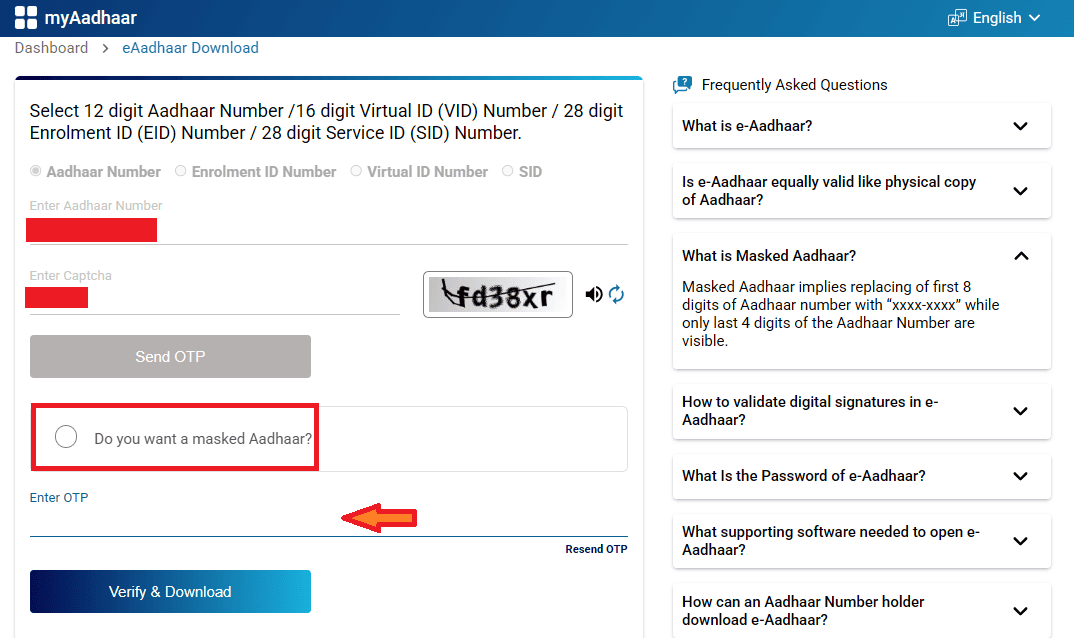
- Step 5: Enter the OTP and click "Verify and Download".
The masked Aadhaar downloads as a password-protected PDF. The password is the first four letters of your name (in capitals, as it appears on your Aadhaar) followed by your birth year in YYYY format.
You can also download masked Aadhaar through the mAadhaar app, New Aadhaar App, and DigiLocker, following a similar process.
Don't Share Your Aadhaar Publicly
This sounds obvious, but UIDAI has had to repeatedly remind people about this. Your Aadhaar number should never be posted on social media, shared in public forums, uploaded to random websites, or left lying around where anyone can see it.
UIDAI's official position is clear: use your Aadhaar freely for proving your identity wherever required, just like you'd use a PAN card or bank account number. But don't put it in the public domain. You wouldn't post your debit card number on Twitter. The same logic applies to Aadhaar.
Practical Rules for Sharing Aadhaar Safely
- When giving physical photocopies: Always write the purpose and date on the photocopy before handing it over. Something like "For KYC verification at [Company Name] on [Date]." This way, if the photocopy is misused, you have some traceability. Better yet, use a masked Aadhaar copy.
- When sharing online: Use VID instead of your actual Aadhaar number. If a website asks you to upload an Aadhaar copy, upload the masked version.
- Never share your OTP: This is the number one way Aadhaar fraud happens. No legitimate organization will call you and ask for your Aadhaar OTP over the phone. If someone does, it's a scam. Full stop.
- Avoid using public computers: Don't log in to the UIDAI portal or the myAadhaar portal from shared or public computers. If you must, make sure you log out completely and clear the browser data.
- Don't store Aadhaar images in unsecured locations: If you have a scanned copy of your Aadhaar on your phone or computer, make sure it's not in a publicly accessible folder or backed up to an insecure cloud service.
Check Your Aadhaar Authentication History Regularly
UIDAI maintains a log of every time your Aadhaar is used for authentication : whether it's OTP-based, biometric, or demographic. You can check this history to see if your Aadhaar has been used for anything you didn't authorize.
How to Check Authentication History
- Step 1: Visit uidai.gov.in and go to "Aadhaar Authentication History" under the Aadhaar Services section.
- Step 2: Enter your 12-digit Aadhaar number (or VID) and the security code.
- Step 3: Click "Send OTP" and verify.
- Step 4: Select the authentication type you want to check (Demographic, Biometric, OTP, or combinations), the date range (up to 6 months back), and the number of records you want to see (up to 50 at a time).
- Step 5: Click Submit. Your authentication history will be displayed.
What to Look For
Each record shows the type of authentication, the date and time, the agency that requested it, and whether it was successful or failed. If you see an authentication request from an agency you've never interacted with, or a biometric authentication that you didn't perform, that's a red flag.
What to Do If You Suspect Fraud or Misuse
If you believe your Aadhaar has been misused or notice unauthorized transactions in your authentication history, here's what to do step by step:
Step 1: Lock Everything Immediately
Lock your Aadhaar biometrics through the myAadhaar portal or mAadhaar app (if they aren't already locked). You can also lock your entire Aadhaar number through the "Aadhaar Lock and Unlock Service." When your Aadhaar number is locked, no authentication can be performed using it. You can still authenticate using your VID.
Step 2: File a Complaint with UIDAI
You have several options:
- Call 1947: This is UIDAI's toll-free helpline. The IVRS is available 24/7. You can reach a customer service executive Monday to Saturday from 7 AM to 11 PM, and Sundays from 8 AM to 5 PM.
- File a complaint online: Go to myaadhaar.uidai.gov.in and use the "Grievance and Feedback" section.
- Email UIDAI: Send details to help@uidai.gov.in with your Aadhaar number, your registered mobile number, and a description of the issue.
- Aadhaar Mitra chatbot: UIDAI's chatbot is available on their official website for quick queries.
Step 3: File a Police Complaint
If the misuse involves financial fraud, identity theft, or any criminal activity, file an FIR at your local police station. You can also report it through the government's cybercrime portal at cybercrime.gov.in.
Step 4: Contact Your Bank
If the fraud involves Aadhaar-enabled payment system (AePS) transactions or any banking activity, inform your bank immediately. Ask them to freeze any suspicious transactions and investigate.
What Happens After You Report
UIDAI investigates complaints and takes action against agencies found violating Aadhaar regulations. The Aadhaar Act, 2016, includes serious penalties for misuse. Identity impersonation can lead to up to 3 years of imprisonment and a fine of ₹10,000. Unauthorized access to the central database carries a penalty of up to 10 years of imprisonment and a minimum fine of ₹10 lakh.
Important Notes
1. All of these features require a registered mobile number.
If your mobile number isn't linked to your Aadhaar, you can't use biometric lock, VID, or masked Aadhaar. Visit your nearest Aadhaar Enrolment Centre to get your number linked.
2. Biometric locking doesn't affect OTP-based authentication.
You can still verify your identity using OTP even when your biometrics are locked. Locking only disables fingerprint and iris-based verification.
3. VID is not mandatory.
You can still use your Aadhaar number directly if you choose to. VID is an additional security layer you can opt into.
4. Locking your Aadhaar number is different from locking biometrics.
When you lock your Aadhaar number (through the Aadhaar Lock and Unlock Service), no authentication of any type can happen using your Aadhaar number. When you lock biometrics only, OTP and demographic authentication still work with your Aadhaar number.
Aadhaar Guides — Related Articles
Detailed guides covering Aadhaar card download, update, enrolment, PAN linking, and more.
Step 1: Open the MyAadhaar Portal · Step 2: Click on "Virtual ID (VID) Generator" · Step 3: Select "Generate VID" or "Retrieve VID" · Step 4: Enter Your Aadhaar Number and Captcha · Step 5: Request and Enter OTP · Step 6: Receive Your 16-Digit VID via SMS.
Aadhaar Complaint & GrievanceIf you're dealing with an Aadhaar problem, whether it's a wrong name, failed fingerprint, this guide walks you through exactly how to file a complaint and what to expect.
Aadhaar Card Download GuideLearn how to download your Aadhaar card online using the UIDAI portal, mAadhaar app, DigiLocker, and other official methods. Step by step, simple and quick.
Aadhaar Card Status GuideCheck your Aadhaar card status online for enrolment, update, and PVC card requests using myAadhaar portal, mAadhaar app, and UMANG app. You can also track your Aadhaar status by calling the UIDAI helpline at 1947.
Aadhaar Card Update GuideLearn how to update your Aadhaar card online and offline using the UIDAI portal, mAadhaar app, and nearest Aadhaar centre. Update your name, address, date of birth, mobile number, email, and photo easily.
My Aadhaar UIDAI Login GuideStep 1: Open the MyAadhaar Portal · Step 2: Enter Your Aadhaar Number · Step 3: Enter the Captcha · Step 4: Request OTP · Step 5: Enter OTP and Login.
Aadhaar Enrolment GuideLearn how to enrol for a new Aadhaar card in 2026. This guide covers required documents, appointment booking, and the step-by-step enrolment process for adults, children, NRIs, and foreign nationals.
Order Aadhaar PVC Card GuideLearn how to order your Aadhaar PVC card online through the myAadhaar portal and mAadhaar app. Check your PVC card order status, track delivery, fees, required documents, etc.
Retrieve Aadhaar Number GuideLearn how to retrieve your lost or forgotten Aadhaar number online and offline using the myAadhaar portal, mAadhaar app, the new Aadhaar app, the UIDAI helpline 1947, or by visiting an Aadhaar Enrolment Centre.
Aadhaar PAN Link GuideLearn how to link your PAN with Aadhaar online, via SMS, and offline using the Income Tax portal. Step-by-step guide covering link status check, late fee payment, name mismatch fix, PAN reactivation, and exemptions.
mAadhaar AppLearn everything about the mAadhaar app. Download, setup, all features explained (VID, TOTP, biometric lock, eKYC, and more), and how it differs from the new Aadhaar app launched in 2026.
New Aadhaar App 2026Learn everything about the new Aadhaar app launched by UIDAI in 2026. Selective sharing, face authentication, offline verification, and mobile number update. Complete setup guide.
Protect Your AadhaarLearn how to protect your Aadhaar from misuse using biometric lock, Virtual ID, masked Aadhaar, Aadhaar Authentication History, and more. Step by step, simple and practical.
Aadhaar Authentication FailedLearn how to fix Aadhaar authentication failures caused by locked biometrics, worn fingerprints, server issues, and data mismatches. Step by step, simple and practical.
Aadhaar Enabled Payment SystemLearn how AePS (Aadhaar Enabled Payment System) lets you withdraw cash, check your balance, and receive government benefits using just your Aadhaar number and fingerprint.